Hello, this is BlackGreenCo:)
Let's find out Schroth method for Scoliosis.
If you don't know or want to know more about Scoliosis, check here: https://blackgreenco.tistory.com/m/21
Scoliosis
Hello, this is BlackGreenCo:) Let's find Scoliosis. Scoliosis 1. What is scoliosis? This is the case in which the s-shaped curve of the spine is twisted in three dimensions due to various causes, r..
blackgreenco.tistory.com
Scoliosis- Schroth method
Scoliosis is when the s-shaped curve of the spine is twisted in three dimensions for several reasons, resulting in deformation.
BlackGreenCo focuses on the Schroth method for scoliosis, peritoneal therapy, and rectification exercises for muscle strengthening after the Adam's test, which allows you to check the lateral and imbalance of the spine.
After the Adam's test, which can identify scoliosis and imbalance, BlackGreenCo helps with the Schroth method, myofascia therapy, and corrective exercises for muscle strengthening.

+ If you've done an X-ray examination, bring an X-ray picture and you'll find a more accurate and faster corrective exercise because you can see the angle, imbalance, and so on only the side.
1. What is the Schroth method?
It is a 3D stereoscopic exercise using breathing method created by Katharina Schroth, a physical therapist who had only spinal cord in Germany in 1920.
Schroth is a breathing exercise method that uses breathing and exercise, which is effective in preventing abnormal spinal curvature (S-shaped vertebrae) and recovering scoliosis by increasing muscle power that straightens the spine.
The Schroth method is divided into three ways.
1. RAB (Rotational angular breathing)
2. Physio-logic
3. 3D made easy

- Schroth movement principle
1. Elongation: The first step that separates the spine one by one and makes you feel like increasing the height is to overcome the pressure of gravity and actively extend the spine.
2. De-flexion: Apply the force opposite the curved pattern in the second step of correcting the problem that has been altered by the side alone.
3. Rotation: This is the third step to check more convex areas, such as the back, to apply forces in the opposite direction of rotation to create the correct alignment.
4. Facilitation: This is not a manual calibration, but a fourth step that helps the patient to recognize and perform their own actions.
5. Stabilization: The final step in stabilizing all Schroth motion is to apply correct posture maintenance and motion to relax and strengthen muscles, and correct alignment of the spine.
2. What is rotational angular breathing (RAB)?
Katharina Schroth thought that the concave side of people with scoliosis was like the crushed part of the rubber ball, and as if air was injected to spread the crushed part of the rubber ball, it was applied to the patient with scoliosis to activate the muscles that were suppressed through breathing in the concave area.
The patient with scoliosis has a symmetrical breathing with the thorax twisted to one side, which can further worsen the deformation.
Therefore, you need to proceed with Rotational angular breathing (RAB) to prevent further deformation.
1. Identify the location and direction of deformation.
2. The hump of the protruding convex side can be contracted in, and the crushed concave side can be extended through breathing.
3. Applies in four blocks, shoulder, back, waist and pelvis, and returns the modified blocks from the thoracic/lumbar to their original positions to relieve scoliosis and correct the spine.

- Rotational angular breathing (RAB) method
1. When you breathe, breathe in using the ribs that you don't usually use. At this time, you should think consciously and proceed with the breathing process so that you can consciously breathe in and inflate the Concave side of the chest.
The protruding convex side expands together but contracts as much as possible to prevent further expansion.
2. Take a slow breath and stop for about 5 seconds at the end. At this time, remember the feeling of muscle expansion through breathing in the concave side.
3. Exhale the air out of the mouth with a 'shu-' sound when exhaling, but increase the resistance of the inflated Concave and the protruding convex side muscles. Try the Thoracic and abdomen remain inflated as shown in the picture (left).
Structural scoliosis is a three-dimensional deformation accompanied by a rotational deformation of the vertebrae as the pattern is bent three-dimensional. The thorax protruding from the deformation of the thorax does not contract well when exhaling, and the crushed the thorax does not allow enough air to enter.
This can cause shoulder, rib, pelvis, as well as spine to be twisted and reduce lung capacity. Therefore, people with scoliosis should do breathing exercises every day.
3. What is Physio-Logic?
Physio-Logic is an exercise that aligns the sagittal plane.
Spinal scoliosis is observed in the frontal plane, and in the sagittal plane, the curve of the spine is reduced and turned into a flat back.

- Kyphosis of Thoracic --> Lordosis + Rotation
- Lordosis of Lumbar --> Kyphosis + Rotation
Therefore, the movement to relieve the alignment of the sagittal plane must be preceded. Any movement that eases the alignment of these sagittal planes is called Physio-logic.
Physio-logic aims to restore kyphosis of thoracic and Lordosis of Lumbar, especially lumbar's lordosis.
The reference point for lordosis is L2.
So Physio-logic is a mobile exercise to improve the mobility of the flat back of the thoracic and lumbar vertebrae.
Physical-logic exercises like this are carried out mainly in a sitting position, table top position, and use various small tools such as wall bar, bar, band, Pilates ring, etc.

The most important thing when doing Physio-logic on patients with scoliosis is to find the Apex of the thoracic and lumbar vertebrae that an individual has and induce the movement of that part exactly.


-Sitting kyphosis sagittal plane
1. Face the wall bar in front and sit on a ball or chair. Support the knees and elbows in the wall bar.
2. Based on L2 (lumbar number 2), the lower waist and pelvis are immobilized and the Schroth breathing is done. (10-20 Times)
3. In the state, roll back and forth over L2 (lumbar number 2) while pushing both elbows to make a kyphosis. At this point, the lower back and pelvis should remain immobilized based on L2. (10-20 Times)
(If you do not have a Wall bar, you may use the wall.)

-Cat & camel
If you've never done a sitting kyphosis sagittal plane before, and you don't know how it feels, practice with Cat position first.
If the angle of the side is minor (15-20 degrees), this movement alone can improve the angle of the scoliosis and can be applied to treat back pain.
4. What is 3D made easy?
The five basic principles of spinal scoliosis correction movement are applied to stand upright. This method also works with Active in Daily Living (ADL).
ADL is a way to improve scoliosis in everyday life by properly holding the usual posture of sitting or walking through retraining patterns in everyday life.
1. Elongation
2. De-flexion
3. De-rotation
4. Facilitation
5. Stabilization

It is a method of aligning the twisted pelvis with the shoulder through De-flexion and De-rotation, and correcting the bent spine through De-flexion and De-rotation and Rotation Breathing (RAB).
In other words, it keeps the twisted head, shoulders, waist, and pelvis in the opposite direction, helping patient with scoliosis recognize the body's distortion and make my body straight.
It is important to apply scoliosis exercise to both RAB/Physio-Logic/3D made easy/ADL through the operability and stability of the existing calibration movement.
5. What are the advantages of the Schroth method?
1. It consists of breathing, stretching, and muscle strengthening, and it is an exercise method that can be practiced in everyday life.
2. Helps relieve scoliosis and correct external posture.
3. Non-surgical exercise.
In the case of scoliosis exercise, breathing is the most important and basic, so it may be difficult to follow it alone at first.
So, let's find some easy exercises that you can do alone.

- Alternate arm & leg lift
1. Stretch your right leg backwards from the four-legged position.
2. Lift your right leg and left arm as you exhale. At this point, you can feel the force in the abdomen, buttocks, and waist. Keep it lifted for 5 seconds. (10-20 Repeat)
3. Do the same for the other side.

- Plank
1. Spread both elbows shoulder-wide while lying face down.
2. Lift your body from head to legs so that it is straight.
3. If your back hurts, hold your knees on the floor. (30 sec-1 min hold)

-Muscular relaxation: Subclavius, Pectoralis Major/minor, Latissimus dorsi
1. Place the foam roller on the armpit side and move the body forward and backward so that the chest, armpit, etc. can be irritated.
2. If you have severe pain, don't move and keep breathing slowly. (1 minute)
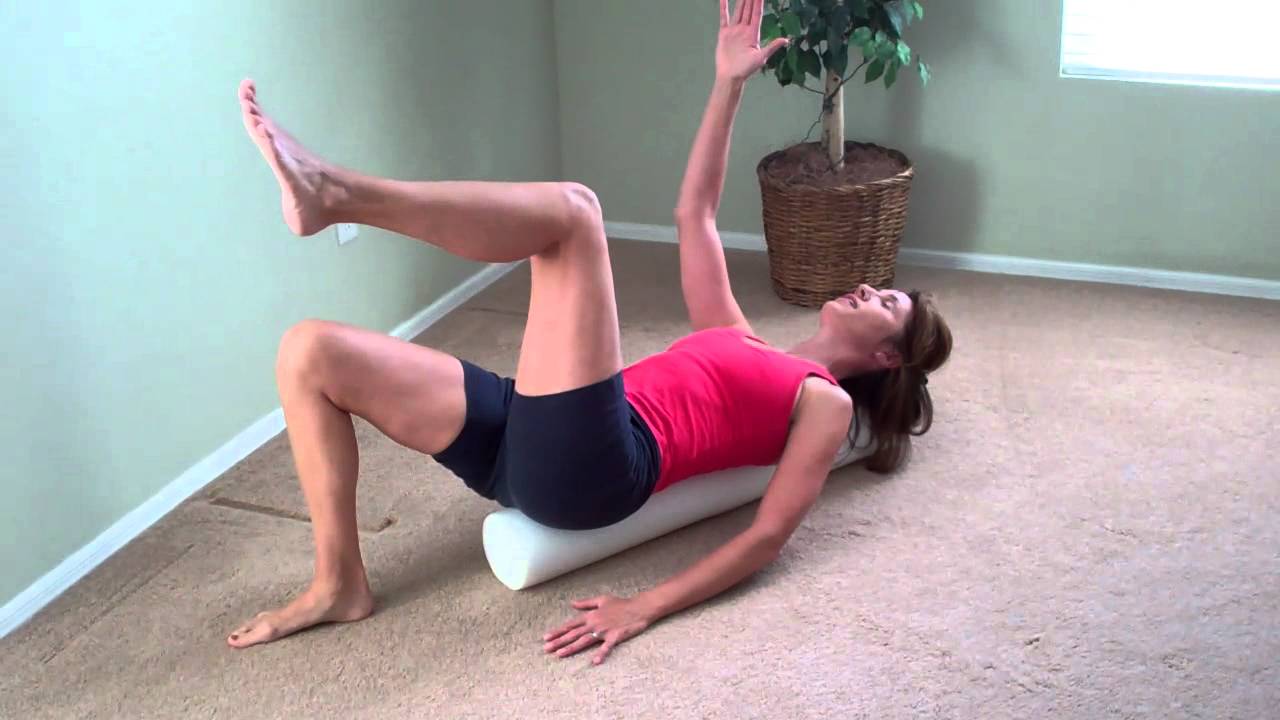
-dead bugs
1. Lie down on a foam roller and center.
2. Lift your right arm and left leg 90 degrees. Hold for 3 seconds and proceed to the other side.
3. If you don't have a roller, or if you can't balance it, proceed with the movement on the floor. (10-20 Times)
If you suspect scoliosis, it is recommended that you take an X-ray examination and an Adam's test.
Especially in adolescence, it is recommended to consult an expert because the angle of scoliosis may suddenly increase.
BlackGreenCo helps with the Schroth method, myofascia therapy, and corrective exercises for muscle strengthening.
BlackGreenCo helps you build a healthy body through these three methods:
The fascia relaxation, steady stretching, and muscle strengthening through proper exercise
If you are interested or have any questions about this class,
Please contact blackgreenco@gmail.com
'Exercise' 카테고리의 다른 글
| Asymetric Pelvic Exercise(3, 4) (2) | 2020.05.17 |
|---|---|
| Asymmetric Pelvic Exercise- Stretching (1, 2) (1) | 2020.05.16 |
| Lower cross syndrome stretching(1, 2) (0) | 2020.05.10 |
| Upper Cross Syndrome Exercise(3, 4) (0) | 2020.05.09 |
| Upper Cross Syndrome Stretching(1, 2) (0) | 2020.05.08 |


